Excel tip: How to create a sequence of dates in Microsoft Excel
Need to create a sequence of dates? It’s very easy using Excel’s AutoFill feature.
Step 1.
Enter a date in a cell (It has to be recognised as a date).
Step 2.
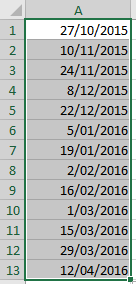
In the cell below, enter the next date in the sequence. The example below shows two dates a fortnight apart.
Step 3.
Select both cells.

Step 4.
Hover over the AutoFill handle in the bottom right corner of the selection.

Step 5.
Drag the AutoFill handle down as many cells as you need to go. You create a sequence of dates. No need to work out when the next date in the sequence is going to be.

![]()
Enhance your computer training skills with courses at Odyssey Training.
Odyssey Training is dedicated to equipping the nation’s workforce with the skills to enhance their competitiveness in the workplace. Discover our range of Microsoft Excel training courses from beginner to expert levels.


